The Art of Open Source

What is Open Source?

By definition according to opensource.com (supported by RedHat) open source refers to something people can modify and share because its design is publicly accessible. Lets think about this for a second, specifically the part that says ‘something people can modify’. That is an interesting concept; does this mean that open source projects are not finished work? Are they merely a starting point, a skeleton template if you will? I think this is the one thing that some people out there struggle with and why for some there is a difficult transition from closed software to open source software. Hopefully by the end of this posting I will have created something others can use to help understand the art of open source.

Open vs Closed Source

What are the differences between open and closed source software? Is one better than the other? Does the support most closed source solutions give you justify the cost? These are all very real and very valid questions that I find I am asking myself more often than not these days.

Early in my career I never used open source software…for anything. The companies I worked for just didn’t use it, it was all pay to play and at the time I didn’t know any better…or worse depending on how you look at it. As I progressed in my career I learned of open source projects that would do the same function as many of the paid solutions that were currently in use; some of them were even the upstream of the paid product that was in place. So I asked myself, why am I using the paid downstream when I can get the same thing for free?

When deciding whether or not to go the open source route there are two things to consider immediately. The first and most important being risk. What is the risk to the business? If there is an outage or bug what is the impact if something goes down? How quickly can I or my coworkers fix the system without paid support? These are all important questions when talking about the enterprise. The second is always budget. Do we even have the money for a new paid product? Does the functionality and support justify the cost? Lastly it is always important to decide whether it is a growing project with a thriving community. The worst thing you could do is to buy in to a project with little community support and eventually have it die….Candlepin?…Hopefully RedHat will revive that…Talking to you Katello guys.

Anyway, I digress. But the point is, when all your questions are answered, you have all the information at hand and you are about to make your decision there is one last question to ask yourself. Are you going to be involved in the community? Are you going to become a subject matter expert (SME) or as I like to say Lead Knowledge Dropper (LKD)? Are you willing do dig through source code, test new patches, run RCs in dev? If you can’t answer yes to at least a majority of those questions then you need to open up that check book.

Open Source…Bringing People Together

Lots of people complain about open source projects not having good support, or not doing everything they want. There is this strange misconception that if you pay for something, it will be better, it will do more and it will do everything you want it to. Yea maybe this is true depending on your skill set and how high up you want to roll those sleeves. Buy by and large if you are picking good open source projects to buy into (ones that are backed by real companies and not some guy that just codes for fun) more likely then not you are getting the same thing if not more than the paid alternative. RedHat is great for this; take a look at the long list of open source projects they back. These are really amazing pieces of software that they saw real potential in and wanted to help grow….also package up into a branded downstream to make a little money too.

More so then that one of the main reasons I enjoy working with open source software so much is the community. There are tons of people I talk to on a daily basis across the world. We all collaborate on what is going on with the project and how to make it better and we help out strangers as well who hop in and out of IRC only when they need help. All of this collaboration drives innovation and that innovation drives participation. This participation is what makes open source such an art form. I can clone down a repository, write some code, write some tests and submit it for approval to be merged into the official project. By doing this I know have a new feature that I wanted so I can no longer complain that it doesn’t do something I need, while also making it better for whomever else out there might have had the same complaint, or didn’t even know they wanted that feature.

In order to make impactful change through technology, technology must be in tune with the business/end users. If your end users are also technical then what better way to grow your software then to have a community of contributors submitting features they find useful.


Documentation: The Lost Art

Overview:

If you have made it this far in your career and have not been lectured on the importance of documentation, told you needed to improve your documentation skills, or that you do not do enough documentation I applaud you. . . seriously, I really do. Documentation is the bane of my existence and the only thing I hate more than doing it is maintaining it. usually get sucked into either going deep into the weeds or glossing over minor details in my documentation; both of which do not help anyone. Today I am going to share with you some tips I have learned over the past couple years on ways to more easily create and maintain documentation.

Documenting Your Code:

Here is the deal, document your code IN YOUR CODE! Do not have external documentation in a wiki or some other thing for code you write. Also do not have full documentation inline.

README Files:

Be very diligent about creating a concise and informative README file. I have found it best to create a generic template and then fill in the blanks. If there are sections that do not apply. . . remove them. All of my README files include the following:

  • Table of Contents

  • Overview

  • Description

  • What it Affects

  • Requirements

  • Usage

  • Reference

  • Limitations

  • Development

  • Release Notes/Etc

Not all of those sections are mandatory but it is a nice template to try and follow. If you are not a fan of README files then you can document in your code.

Documenting in the Code:

As I stated above I am not a fan of inline documentation, it is fine for comments and such but is not the place for actual documentation. My preference is a full block of documentation, commented out, before your code even begins. This documentation can follow the same outline as the README file, or be more concise like the example below:

  • Description

  • Parameter/Variable descriptions

  • Requirements

  • Release Notes

Your Code, Your Choice:

Whichever one you decide to go with is the right answer, not documenting is the wrong answer. Documenting outside of your code in a wiki or somewhere else technically is not a wrong answer until it comes time to update the docs. I find it far easier to update the docs with a commit/PR that has new features and fixes then to update the code and go somewhere else and update the docs.

Documentation Articles:

When you have to write documentation that does not relate to code you are usually writing a wiki article or using some sort of other shareable tool. I am not going to go into organizing landing pages and tags and all those other features and things you should be doing to make your documentation read like some sort of manual/book. I am going to focus on a single article.

Formatting:

I am going to be brief and blunt here. Nobody likes reading a wall of black text on a white background. It is boring, it does not hold the attention of the reader, and quite frankly it is not fun to do. Formatting can be hard, and time consuming but when all is said and done you have a nice looking page that reads easily and quite honestly you actually feel like you have contributed something worth while. Please take your time and careful consideration when deciding how to format your document because it can be the unknown decision maker if someone thinks what you wrote is useful/accurate or if you half-heartedly threw some words on a page.

Content:

Level of Detail:

Try not to dive deep down into the weeds with your documentation. That level of detail can be discussed in a chat or one-on-one. The goal should be to provide enough detail to get one started and allow them to have enough information to make some decisions that the documentation does not directly address. Every unique scenario or option should not be vital to your documentation. Think more along the lines of quick start guides. You can add more detail than your typical quick start but remember, too much detail and too lengthy you will lose readers.

Videos and Screenshots:

Both are great in theory; both get out of date very quickly. Unless you plan on being diligent about keeping these visuals up to date stick to well formatted wordings. . . is that a word?

If you are creating detailed documentation for something specific then these visuals might be a better fit and change less frequently.

Editing and Review:

Do not review your own documentation. It is likely you will not realize you have skipped important n00b information or have gone off the rails technical. Have someone with less knowledge than you do your review. See if they find it confusing or constructive. Ask them if they feel anything was left out. These people are your greatest resource. . . use them.

Conclusion:

That is my spiel. I hope it helps and I hope I kept your attention. Just remember your primary goal is to give people a starting point and keep them curious. If you can keep their interest peaked they will return and learn more.

Remember you commit code changes frequently with every change completion; document frequently when things change as well. You will definitely avoid those Friday marathon session.

Fostering a Review Culture

Overview

Review culture is often something that is overlooked and you do not realize how
important it is usually until it is too late. Most projects and companies fall
into the trap of encouraging users, developers, admins and anyone else capable to
contribute to their code base by either submitting feature/bug requests and code
for patches or something that does not exist yet. This is a great start and is
most definitely necessary to be successful. However when it comes to promoting
these patches and code contributions from development to productions is when you
find that nobody ever said anything about code reviews. Code reviews might be
the most important part of contributing to something and is definitely the most
overlooked. I know some people will say automated deployments with CI/CD tools
and writing tests etc will negate the need for code reviews, but the reality is
a fully automated pipeline with no human intervention from local development to
production is a pipe dream for most. So what is your contingency plan?

Reviewing Code – Who, What. . . Why?

From my experience in most organizations there is an incorrect perception of
code reviews. Everyone seems to agree that they are important, however very few
tend to agree on what exactly you are reviewing and who exactly needs to review.
My goal here is to try and simplify this a bit and even though there really is
no right answer, maybe my opinions can guide you in a direction.

Who Reviews Code

It almost always seems that the perception is you need to know how to code in
order to review code. This perception in my opinion is incorrect and one of the
main reasons a strong review culture is hard to adopt. Code review is about more
than just knowing the code and that it executes correctly; it is how you learn. You can
gain a deeper understanding of how things work just by reviewing a pull request
without having any prior knowledge. The questions you will have will lead you
down a path of inquiry where you will hopefully continue to learn more.
I guess the short answer to who should review code is anyone and everyone who
wants to contribute. Those that know how to code can review based on
functionality from a technical standpoint while others can review based on
structure and other standards you have put in place. For those that want to make
the jump into doing more technical code reviews a “mentor program” can be put
in place. Pair an inexperienced reviewer with someone who knows the ropes. Let
them benefit from each others knowledge and perspectives. Before you know it
you will have more people capable of doing code reviews than you ever thought
you would need.

What to Review

The easy answer here is to review everything, in detail and be nit picky over
everything. The better answer is to figure out what your automated tests will be
checking for and then fill in the gaps with human code reviews. Code
functionality is usually the top priority for automated testing so it should not
necessarily be the most important part of your human code review. What you
should focus on is more of the structure and syntax of what you are reviewing.
Ensuring there is a style guide that is being followed and that things like
commit messages and documentation meets a standard. You most definitely have the
right to reject a pull request, or at least push back, if it does not conform to
the style guide you put forth and especially if the commit message does not meet
your standards. Many people thing documentation is a no brainer but you would be
surprised how often there is little to no documentation. This is where I am most
stringent because I want people to be able to read a doc and understand what the
code is meant to do, what requirements it has and what dependencies it has in
order to function.

Results

If you put the time in and foster a culture of code reviews and good practices
you will be pleasantly surprised with what your code base ends up looking like.
You need to start at the beginning though. Define standards for commit messages,
documentation, structure etc. Make these well known and documented and then
start enforcing them. Enforce them in the lowest environments possible so it is
known what to expect when going to production. The cleaner your code base and
the more structured it is the easier it will be to find issues and recover.

Locations, Organizations and RBAC

Overview

We are a fairly large company consisting of eight offices and three data centers. Between these eight offices and three data centers we have about six organizations and about 20 products made available to our members. Each of these organizations have developers and system administrators that help manage and maintain their servers. For this reason we needed to build Foreman in a way where everyone can manage their servers and keep Enterprise Technologies from being a bottleneck.

Locations and Organizations

Locations was a no brainer for us. With eight offices and three data centers we definitely needed a way to classify the location of our hosts and in turn use that classification to help configure our hosts with certain location specific data. Enabling Locations in Foreman solved this for us since the location parameter can be used as part of Hiera. The main caveat here is that each host has to have the location assigned correctly, but when you are provisioning via Foreman and have all of your filters configured you will learn pretty quickly if you have the wrong location selected. For existing hosts that we were migrating into our new deployment we wrote a custom Fact that sets the host location based on the subnet. We simply then changed the setting in Foreman to look at the custom Fact ($location) for setting the location value rather than the default $foreman_location.

Hiera Location Example:

[root@devbrain hieradata]# ls
application common.eyaml domain environment location node organization osfamily security_zone vtl
[root@devbrain hieradata]# cd location/
[root@devbrain location]# ls
ashburn.eyaml austin.eyaml aws.eyaml


Location Fact Source:

require ‘ipaddr’
ashburn = [
IPAddr.new(“subnet/16”),
IPAddr.new(“subnet/23”),
]

austin = [ IPAddr.new(“subnet/16”),
IPAddr.new(“subnet/23”),
IPAddr.new(“subnet/24”),
]

aws = [
IPAddr.new(“subnet/16”),
]

Facter.add(“location”) do
setcode do
network = Facter.value(:ipaddress)

case
when ashburn.any? { |i| i.include?(network)}
‘ashburn’
when austin.any? { |i| i.include?(network)}
‘austin’
when aws.any? { |i| i.include?(network)}
‘aws’
else
‘unknown’
end
end
end

Example Locations:

example_locations.png

Organizations was something that we knew was necessary but were not really sure the best way to implement them. At first we thought that we would have enough control by having each product be an organization. This quickly broke down as we learned that each product team has shared human resources at some level. In turn we were going to be forced to grant users permissions to multiple organizations which is something we wanted to avoid. Ultimately we decided to take a different approach than we had originally planned and set each organization to the most over-arching group that we could. This solved our issue with granting users permissions to multiple organizations but now we were faced with the challenge of setting granular permissions per product. We also use the organization parameter in Hiera since their are some (very few) configurations that are organization specific. We did not write any custom Fact since the only object we could base it off of would be the hostname. As we all know hostnames are inherently not reliable so it would be bad practice.

Hiera Organization Example:
this is a brief example but other scenarios could be host access/user permissions or other monitoring configurations

[root@devbrain hieradata]# ls
application common.eyaml domain environment location node organization osfamily security_zone vtl
[root@devbrain hieradata]# cd organization/
[root@devbrain organization]# ls
crimson.eyaml eab.eyaml ent.eyaml

Example Organizations:

example_organizations.png

Enter Host Groups

Host groups can be a challenge, and if implemented incorrectly you are left with an inefficient nested structure that spirals out of control and leaves you with thousands of groups. We know. . . we did this. . . we have this. . . we are getting rid of this. Host groups are almost a necessary evil in the sense that they add complexity to your implementation however you need them for your implementation to be useful. We iterated over our host group structure for weeks before we settled on one that suited all of our needs. We ultimately ended up with what you see below.

Example Host Group for Products:

example_hostgroups

Example Host Group for Enterprise Wide Tools:

example_hostgroups_2

This structure allows us to grant users permissions to their organization and then the subsequent host group. For teams that oversee all products in an organization (it is rare but some do exist) their permissions stop at the organization with no additional filters for host groups.

Role Based Access Control (RBAC)

We have two main roles for each product; a user role and an admin role. There are a few groups that are full administrators and a couple groups that have specialty roles such as our architects and Strategic Planning teams.

The admin role for a product allows users to build, configure, destroy and power cycle their hosts; basically they are the equivalent of a full administrator but for a small subset of the environment. The only restriction we put in place is that they are unable to power cycle or destroy hosts in the production environment.

The user role for a product is mostly the equivalent of the default viewer role. These users are still restricted to their own product but they cannot build, create, destroy, power cycle or edit hosts. They can view and search hosts, facts and reports. These users can also view trend data as well as create trends.These roles are primarily for non technical members of teams that still need to search and find information on their hosts.

Conclusion

This is definitely still a work in progress as we do not currently have all of our teams integrated and using Foreman to manage their hosts. We do believe that the structure we have worked out and the standards we wrapped around it will scale accordingly though. Pending any product rebranding, which does happen but I feel you can not plan for that, we should be able to accurately grant permissions for any scenario. There is always the possibility of user error when creating a new location (rare), organization (rare) or host group (common) but configuring those properly falls under the responsibility of the administrator assigned the task. The bigger unknown is creating new roles with different sets of permissions we have not done before. I find it always is somewhat of a guessing game with trial and error to get the permissions 100% correct for a new role.

Stay tuned as this is only a small part of our infrastructure as a service objective.

Journey to High Availability

Everyone wants to be highly available but so few actually achieve it. A couple months ago TheForeman team asked me to do a case study and blog post on the highly available implementation I built. The story is below, but it’s only the start….

Overview:

We started with Foreman almost two years ago now because we simply needed a front end to Puppet and the Open Source Puppet Dashboard just didn’t fit the bill at the time. We deployed an all in one implementation as a POC using MySQL and eventually moved into production with a PostgreSQL database and two clustered external Puppet Masters. The Puppet CA lived on Foreman as well as the Smart-Proxy and we set up an unnecessary host group structure with an obscene amount of Smart-Class Parameters; we did not use Hiera at the time. As our environment grew our implementation became slower and slower. We added resources but at the end of the day it was still a single instance running the Puppet CA, Foreman webUI and the ENC/Reports functions. As we grew to over 1,000 hosts (today ~1,800) things got worse; our host groups increased, our Smart-Class Parameters increased and our performance decreased. We lived with this for some time being satisfied with the status quo until we set an initiative to deploy an implementation suitable for an enterprise. It is here where all the fun begins.

If you are interested in watching the live discussion on this topic here is an interview as part of the Foreman Case Study series. Foreman HA Case Study

Requirements:

Before the project began we needed to come up with a list of requirements the implementation needed to meet and prioritize what is necessary now and what we can implement in the future. Below is what we came up with.

  • High availability at all tiers
    • Foreman
    • Memcache
    • Puppet
    • PuppetDB
    • CA
    • Database

This was the highest priority. We needed our implementation to be up at virtually all times. We also wanted a deployment that allowed us to test updates safely and not have to plan all maintenance for after business hours.

  • Built with the latest available versions that we could support
    • Foreman 1.9.x
    • Puppet 3.8.x
    • PostgreSQL 9.x
    • CentOS 6.x

We decided that our existing deployment was to be considered legacy and we were going to build everything new. Since we were starting from scratch we decided it would be best to build with the latest and greatest (within reason). Puppet 4 and CentOS 7 were just not doable at this point in time which is why we went with 3.8.x and 6.x respectively.

  • Provision new hosts
    • VMware
      • CentOS/RHEL
      • Windows
    • AWS
      • CentOS

We are close to a 100% virtual environment using mostly VMware and some AWS. Deploying hosts from two different tools just wasn’t an option moving forward. We also needed to increase the consistency of our server builds and where the new hosts lived in Foreman.

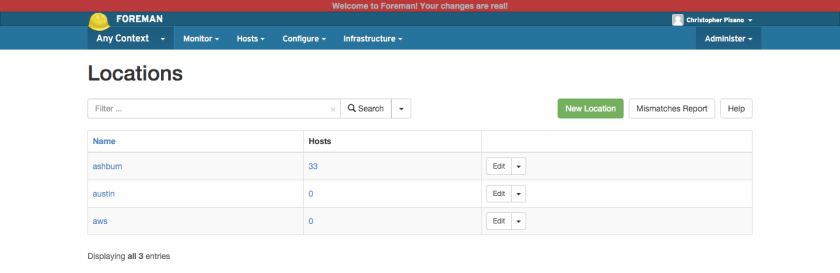
  • Support multiple locations
    • Two physical data centers
    • AWS

Because we have more than one data center and a private cloud we needed Foreman to support hosts that live in all places. Different product teams servers live in a different combination of locations and we need to be able to distinguish that for access permissions as well as reporting.

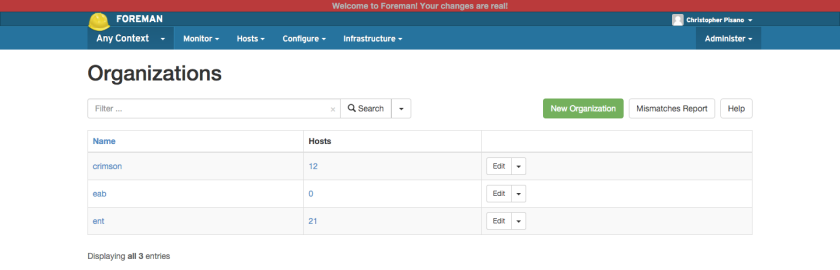
  • Allow product teams to manage their hosts
    • Equivalent of admin rights
    • Only to the hosts they own

One of our main goals is to empower our product teams to manage their servers without having our Infrastructure Operations team be a bottleneck. In order to achieve this we need to have an organized structure of locations/organizations/host groups as well as role based access controls for users.

  • Integrate with DHCP and DNS
    • Clustered MS DHCP
      • One cluster in our main data center
    • MS DNS
      • DNS servers per location

Part of the goal is to have Foreman manage our servers lifecycle and increase our efficiency and consistency in provisioning. We can provision without IP addresses and nobody is going to remember the IP addresses of all of their servers. An added benefit is that Foreman cleans these up when hosts are destroyed; something humans rarely do. . . or at least remember to do.

Foreman HA

The Implementation:

Building the Infrastructure:
I will discuss building the entire deployment with the exception of the database. Our Enterprise Data Management team built and maintains our PostgreSQL backend; we just have a username, database name and password to connect with. They are using PostgreSQL 9.x and utilizing PG_Pool for high availability.

Foreman and Memcache (The fun stuff):
The first thing we needed to do before building out our Foreman cluster was to actually figure out what was needed and how Foreman works on a deeper level. Naturally the first move was to go directly to the community in IRC and the Google groups to consult with others that know more than I do. There are two ways you can build your Foreman cluster; a single cluster for all functions or two separate clusters broken out for ENC/Reporting and a webUI. After doing some research into each we decided to go with the simpler single cluster knowing that in the future (sooner than we are expecting) we will need to build a second cluster dedicated to ENC/Reporting functions. Luckily this is an easy change in architecture to implement and can be done with little impact. That is for another post though, so I will focus on what we ended up doing. After some consideration we decided to go with a three node cluster (by the time this gets published it might very well be a four node cluster). We were going to originally go with a two node cluster but since our legacy stuff makes heavy use of smart-class parameters we wanted the extra node to help spread the load rendering all of the ENC data for hosts we aren’t going to migrate to our new code base. We also learned that Foreman stores it’s sessions in the database so loadbalancing wasn’t going to be as complex as we originally thought and we could actually look at implementing some cool things in the future since we don’t need to implement any type of persistence. Another important thing to know is that each Foreman server will have their hostname based Puppet certificate, but for clustering you will need to generate a generically named certificate to be distributed across your Foreman servers and used for the webUI and ENC/Reporting functions. We generated the certificate based on the URL name we were going to use.

It was realized pretty late in the implementation that memcache was going to be necessary to function properly. We found out that Foreman keeps a local cache of certain information that it will default to rather than continually making calls to the database. Having a multi-node cluster would mean that any of this information could be or could not be in sync at any given point in time. So to work around that we implemented two memcache servers and the foreman_memcache plugin. Between the plugin and the memcache Puppet modulethe setup couldn’t have been simpler and all of our data and information was kept in sync without issue across our nodes. The two memcache servers we built we kept outside the load balancer (Foreman talks directly to them) since it is not necessary given the way memcache works.

When it came time to configuring the loadbalancer for our Foreman cluster it was pretty straight forward. We decided to do SSL passthrough though that will most likely change in the near future. We have the loadbalancer configured to pass traffic on ports 80 and 443 however we initially set up a 443 redirect which caused some provisioning issues. Basically we had it so any http traffic to Foreman that came in on the load balancer we redirected to port 443 which broke some provisioning functionality (user_data for us) since it only works over http. Once we removed the redirect rule from the loadbalancer all provisioning issues resolved. We also temporarily ran into some authentication issues which originally seemed sporadic but we soon figured out that authentication was only working on one of our Foreman hosts. Once again by going to the community in IRC we quickly learned (and should have realized) that we needed to have the same encryption_key.rb file distributed across all Foreman hosts. We distributed the file from the working Foreman host to the others, restarted the service and all authentication issues were resolved.

At this point we successfully had Foreman clustered. We were able to drop nodes from the load balancer, restart services and power cycle hosts without impacting availability or performance. This was just one peice of our implementation though; we still needed our Smart-Proxies and our Puppet infrastructure.

Smart-Proxy:
We are currently using three forms of the Foreman Smart-Proxy; Puppet, PuppetCA, DHCP. We are looking to implement DNS soon but were unable to complete it during this timeframe. All of our Smart-Proxies are configured to talk to the URL of our Foreman cluster that passes traffic through the load balancer.

We were fairly new to using the DHCP Smart-Proxy and were a little unsure of how the setup and configuration was going to go. To our somewhat surprise it went rather smooth only running into two minor issues. We run MS DHCP so I quickly learned a good amount about Windows and what was needed to install and run the Smart-Proxy on a Windows host. The documentation in the manual is very good and made the install and configuration very simple. We hit two bugs which are known and hopefully we can help contribute patches to resolve them. The first was with the Smart-Proxy showing the DHCP reservations as leases and not having showing the hostnames which is tracked as bug #10556. The other bug we hit was that the Smart-Proxy does not honor DHCP exclusions which is tracked as bug #4171. Besides those two issues everything went as expected; we were able to implement a work around for each. The first issue has a work around in the ticket and we worked around the second by being able to utilize previously unused ip space in our /23 subnets. Since we installed the Smart-Proxy on MS Server 2012R2 we did get some deprecation warning from Microsoft about netsh which we filed an issue for that is tracked as refactor #12394.

Setting up the Smart-Proxy on the Puppet CA servers was pretty straight forward and we were very familiar with it from our previous implementation. The main difference this time around was that we were going to have clustered Puppet CA servers so we needed to run a Smart-Proxy on each. We installed the Smart-Proxy via the foreman-installer and used a genericly named certificate that we can put on each host. Since the Puppet CA servers are behind a load balancer we needed to configure the load balancer to also pass traffic on 8443 for the Smart-Proxy. The Puppet CA cluster is configured to be active/passive with shared storage for the certificates so all requests will hit one host unless it becomes unavailable.

We are also very familiar setting up the Smart-Proxy on our Puppet servers so this was fairly trivial as well. We had previous experience setting up the Smart-Proxy on clustered Puppet masters so we followed the same process as before; genericly named certificate distributed across our Puppet servers and the Smart-Proxy installed and configured via the foreman-installer. We did implement the puppetrun feature of the Smart-Proxy utilizing puppet_ssh so we had to orchestrate the distribution of the ssh keys for the service account we planned on using. Again since our Puppet servers were to be load balanced we had to allow the load balancer to pass traffic on 8443 as well. The Puppet server cluster has all nodes active at all times so requests well be spread across any available node.

As I stated earlier future plans are to implement the DNS Smart-Proxy as well as implement the MS DHCP cluster ability in Server 2012R2 and then clustering the DHCP Smart-Proxy.

Puppet:
I will not go into great detail about our Puppet implementation since this is a blog posting for Foreman but I will give enough of an overview to gain a decent understanding of how to build highly available Puppet. If you have any questions or just want to chat about this type of implementation and what we ran into/did in more detail feel free to ping me on IRC. Username: discr33t.

The foreman-installer makes this very easy since it can be used to configure your Puppet masters and Puppet CA. We started by building four Puppet masters using Puppet Server v1. This will ease our upgrade to Puppet 4 when the time comes and for the time being give us better performance and tuning capabilities of our masters. Since we wanted to have the CA separate from the masters we set CA => false and specified the DNS name of what we wanted our CA server to be.

When going through the installer be sure to not use the hostname for any certificates for the Puppet masters, CA servers or PuppetDB servers. Since we are clustering everything we will be use generically named certificates that we will be generating on our CA. This will allow the certificate to be verified when requests hit any of the hosts in the cluster. Each of the Puppet masters, CA servers and PuppetDB servers will use their hostname based certificates when running the Puppet agent. The server setting should be set to the name of your generic certificate for your Puppet masters; similar to what you did for the CA.

On your load balancer of choice you will want to add all of your Puppet masters and allow the load balancer to pass traffic on ports 8443 (Smart-Proxy) and 8140 (Puppet). You should configure your load balancer so all nodes are active. If you are using version control for your code and a continuous integration server for deployments you might want to look into setting up shared storage for your Puppet environments (we did with NFS on our NetApp) and allow the load balancers to pass traffic on port 22 so your continuous integration server can log in and run your scripts to pull code. Another option would be to use a tool such as r10k.

While on the topic of shared storage for your Puppet masters it is not necessary but you should use shared storage for /var/lib/puppet/yaml. If you don’t you will receive a warning message until the Puppet agent for every host checks into each Puppet master at least once.

Again we used the foreman-installer for our CA servers and mostly followed the same process. We wanted to use Puppet Server V1, a generic name for the certificate to be used and the Foreman Smart-Proxy installed. The differences are that now we want CA => true and for the Smart-Proxy you want to only enable the puppetca module. The load balancer configuration is almost identical with the exception of port 22 and you want an active/passive configuration rather than an active/active. This is because the inventory.txt file is not locked when the process runs and active/active risks corruption. You will still need to keep /var/lib/puppet/ssl in sync between the two CA servers. There are many ways to do this but we chose shared storage.

We wanted to institute PuppetDB for the insight it will give us into our environment and for some of the advanced features it offers. We used the PuppetDB module to install and configure both PuppetDB servers, and the configuration for PuppetDB on our Puppet masters. Just like the CA servers and the Puppet masters we want to use a generically named certificates for the PuppetDB servers. There is no Smart-Proxy configuration necessary here, but PuppetDB does need to have a database backend. We chose to have our Enterprise Data Management team give us another database on the same cluster Foreman will use. The load balancer configuration is pretty straight forward; we did active/active passing traffic for ports 8080 (http for the dashboard) and 8081 (https for Puppet).

Once you have these three peices functional a big congratulations is in order because you have just built a highly available implementation of Puppet! Though PuppetDB is not necessary it is the icing on the cake for this part.

Conclusion:
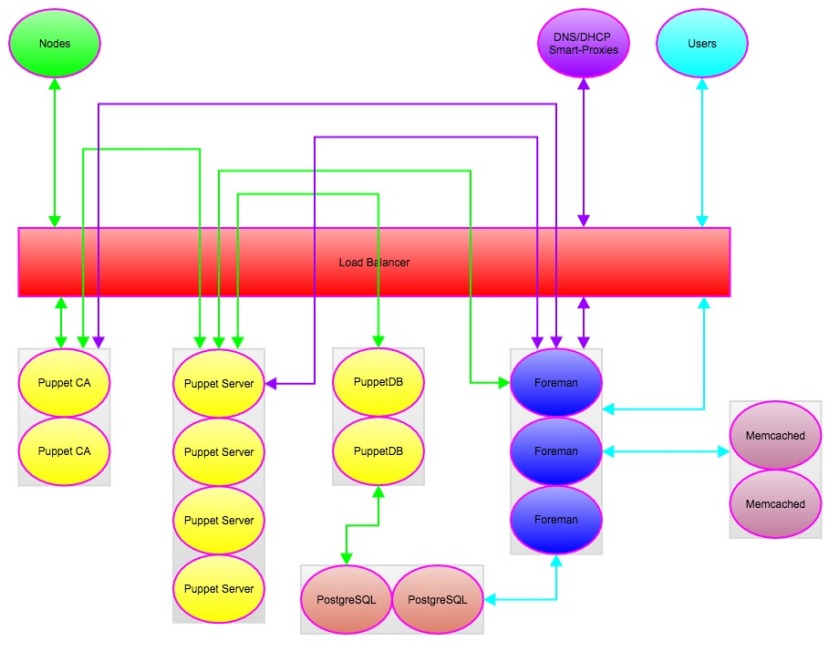
Through all of this we have managed to build a highly available implementation of Foreman and Puppet to help us provision and manage our infrastructure. So far things are going well but there is more we want to do and will need to do as our environment grows. We are no longer using Smart-Class parameters and are fully utilizing Hiera, though we make use of some custom made parameters in Foreman to build a better Hiera hierarchy for our environment. I hope this is helpful reading to others looking to achieve the same or similar implementations. I can’t thank the Foreman community enough for their continued help. Keep an eye out for future blog posts for how we are using Foreman to help us implement an infrastructure as a service model within our firm. An architecture diagram of our final product is linked below for those interested.